Stick Display Plaque
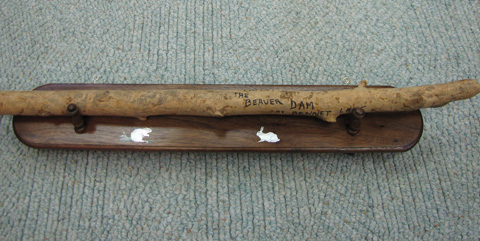
Recently I came into possession of a stick with some writing on it. The stick was taken from a beaver dam on Bennet lake in 1973. It so happens that my wife is related to the people that had a cottage on Bennet Lake and I thought they would like to have the stick as a memento of that cottage.
But the question in my mind was how to display that stick. Finally I thought of a simple wall plaque that could be hung from picture hangers. Then I thought that some inlay on the plaque would look good, so I did a little research to find images of woodsy critters, including an industrious beaver and a rabbit which really look good inlayed into the walnut plaque.
Below is the finished plaque with three coats of Tung oil on it.
You can see the making of the plaque in “My Work” under the heading “A Stick Display Plaque”.
The new guitar is Playable
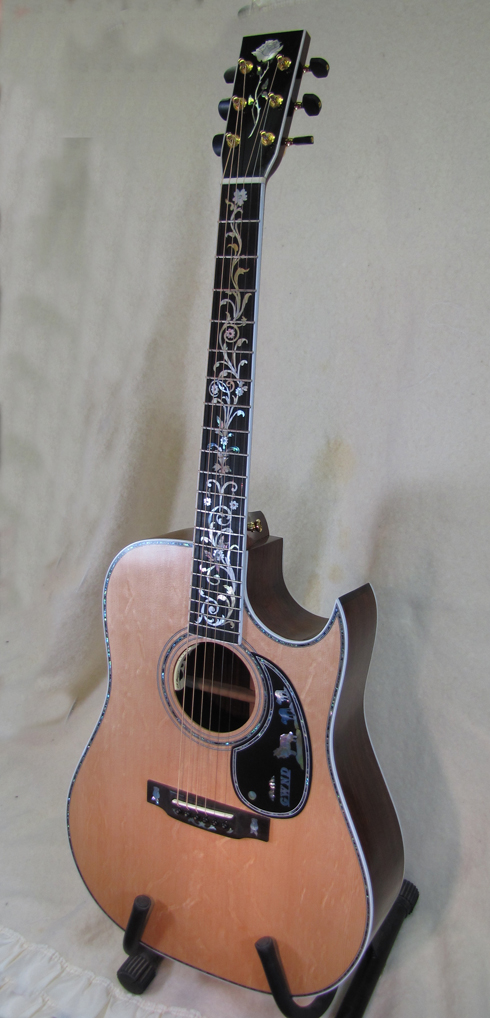
Well it’s finally finished to the point of being playable. There’s still a little bit of fretwork to be done, but it certainly sounds good. The sustain is fabulous – it just sings forever. If you want to see the final days of the build click on “Guitars and s Banjo” then on “A second GWND Guitar” then on “2nd Guitar – 9th Installment.
Here’s a photo of the guitar – isn’t it gorgeous :
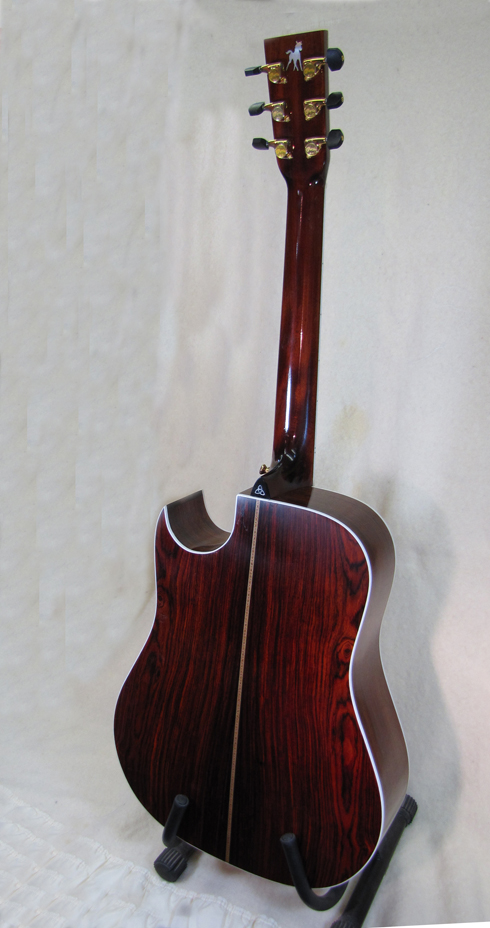
And here’s a picture of the back:
A slideshow can be started by clicking on any of the thumbnails below – Have a look:
Progress on the guitar – May 23, 2011
Again, this post is brief. If you want to read all the gory details, you are welcome to click on “Guitars and a banjo” (home page) then “A second GWND guitar” and finally on “2nd guitar – 8th installment”.
Monday, May 23, 2011, was Victoria day – a holiday in Canada and an opportunity for Canadians to travel south, and shop in the United States. Many people do. It didn’t dawn on me all that much, because being retired means you don’t have to go to a job on a regular basis, therefore holidays aren’t quite as eagerly anticipated. This non-attention to the holiday made me wonder for a while on the way back home as I approached the US / Canadian border, and encountered a long lineup of cars. What could be the cause of this, I wondered, until I called my wife, (who is much more “with it” than I am) and was reminded that it was the end of a long weekend so naturally there’d be a long lineup…. Took me over an hour to cross over into Canada and believe me – the guards didn’t waste time.
When I had left for home the last time, the guitar had been sprayed with a coat of lacquer and was awaiting several more coats. I was to come back after approximately nine coats had produced a solid base, and enough time has passed for the lacquer to cure. I would sand the guitar, then go home for a week while some finishing coats were applied. So I was expecting to simply stay for one day, sand the guitar body and neck, and leave for home.
Unbeknownst to me the guitar had been sanded in the interim, by Lee, sprayed, and was now ready for final sanding and assembly. This would take a minimum of two days and maybe three. However even though I could only stay the one day, a lot got done, and I can see now that my original time estimates were somewhat optimistic.
The progress this day included sanding the guitar body and neck, gluing the heel cap to the heel of the neck, and more sanding of the body. it was a good days work.
Also, I managed to photgraph a mirror and inlaid frame that Kief had worked on. It’s well worth a look. Click on “Inlay Artists” then “Kief Sloate-Dowden” then “Mirror” to see it. It’s well worth the visit.
As usual – click on a photo to start the rather short slideshow…
Progress on 2nd guitar – May 09th to 11th
This is the short version. Brevity is what most people appreciate, but the true diehards that want all the gory details are welcome to click on “Guitars and a banjo” (home page) then “A second GWND guitar” and finally on “2nd guitar – 5th, 6th, and 7th installments”.
On Monday May 09, 2011, I was able to go to Malone NY to hopefully make progress on the guitar I was building. The first day was a very productive one, and five things were accomplished.
1 – Insert abalone dots as fret markers on the neck binding.
2 – Seal the neck
3 – Finish binding the Florentine cutaway.
4 – Fix the pickguard.
5 – Sand, Sand, sand
Here are a few highlights:
More on building a guitar – Wednesday
Again a great breakfast. Three egg omlette with veggies, bacon, toast, coffee, OJ & jam. Couldn’t finish it all.
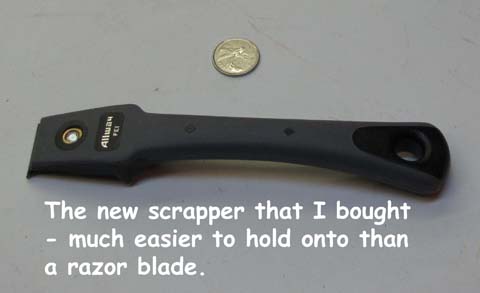
Showed the new scrapper to Dave and Lee – It works well.
I removed the tape from the guitar binding, then used a scrapper to bring the binding as close as possible to flush with the top and back of the guitar. Later it will be sanded to be perfectly flush.
I also removed the tape from the headstock. Scrapped the binding flush with the top and sanded it. Then I sanded the sides to remove the glue line where the binding meets the headstock. It looks good.
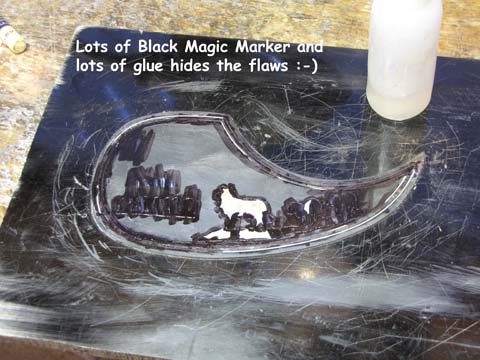
During a lull in activity, I continued with the pickguard. I scrapped the border splines almost flush with the plastic. Then I sanded it with 80 g and 150 g sandpaper. Kief encouraged me to glue in the MOP & abalone pieces into the pickguard. Black Magic Marker is used to colour the cyanoacetate glue which in turn hides the flaws in the routed cavity. So…. Lots of Black Magic Marker and lots of glue and finally accelerator. Then I sanded the pearl and abalone flush with the plastic. It takes forever – hard on the arm and the back.
Before it was completely sanded Dave had some time available so we pulled the teflon out of the groove. He showed me how to sand the angles on the abalone strip with a drum sander in the dremil. The abalone is inserted in the groove so that black (inferior) side is positioned upwards, so that when it’s sanded flush with the plastic the “good” side of the abalone shows. The strip is “crushed” into the groove so that the pieces conform to the curves. I tried, and couldn’t keep the pieces of the abalone from falling out of the groove, as it’s very shallow.
I asked for help and Dave showed me how to put a few drops of crazy glue on a plasticized piece of cardboard, then to transfer little drops on the shank of a dremil burr to the abalone pieces to tack them in place. This worked much better.
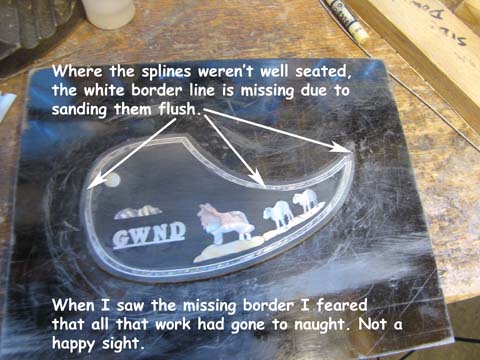
I finished the border by applying lots of crazy glue, black magic marker and accelerator. Then I sanded it smooth. Unfortunately in sanding the tip of the pickguard as well as some other pieces of the spline disappeared, and I felt that the pickguard might have to be scrapped. Not a happy camper at this point !
As I was leaving that afternoon, Dave interrupted a telephone conversation to say that it could be fixed with a tiny router bit and some more spline. I felt better as I left.
More on building a guitar – Tuesday
Tuesday April 05, 2011 – A fabulous breakfast at the Park Street In in Malone, New York. Fruit dish, coffee with Sweet & Low & milk, Bacon, Egg, Fried potatoes, toast, jam. Wow !
We started by routing the back of the guitar for binding. Lee and I installed the binding using Duco model cement. To hold it in place we used strips of good masking tape, alternating one up, then one down.
Next I routed the top for the abalone purfling – that’s that fancy green / blue shell material that sparkles. The way it’s done is to route the rabbit, then glue in strips with a teflon strip in the middle. The teflon strip is immune to glue, so after the glue dries, you can pull out the teflon strip, and replace it with crushed abalone. Then sand everything smooth. So, after four passes by the router, we glued in the strips – Blk/Wh/Blk, Teflon strip, Blk/Wh/Blk, and finally white binding.
The above took time – several passes with the router, several adjustments, several teeth grittings, and several blue words, before the purfling and binding were finally taped in, waiting for the Duco cement to dry. Not as easy as the photos seem to indicate.
Around 3:00pm I asked about binding the headstock. Much discussion followed. Dave and Lee felt it was too late in the process because the nut had already been installed, preventing good access by the Dremil router we were using. I argued that there must be some way to do it. Finally Lee suggested that a binding cut down to a little over the thickness of the top veneer would work. The trouble was that the only binding we had was too wide and cutting it down would be a problem. Dave reluctantly used a special dremil router with a jig, held between his knees, to cut the binding to size. First he taped his fingers and then fed the wide binding through the jig and it came out the appropriate width. Scary – but in the end there was no blood lost, and there was the same number of fingers at the end as there was to start with. Sigh of relief – I was sweating – I really didn’t like that part – I hate blood.
Dave explained that I would have to use the inlay router (different from the dremil) to cut the rabbit for the binding. He used a compass to scribe a line around the perimeter of the headstock. He told me to chalk the scribed line and to route up to the line. “Leave the line showing” he said. So I routed as close as I could, then filed it smooth. Lee and I glued in the white binding, and taped it. It will look nice in the morning when the tape comes off.
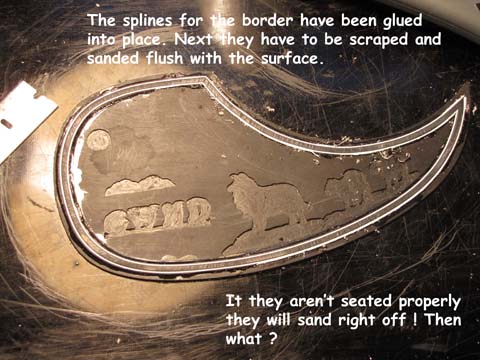
While the glue on the headstock was drying, I worked on the abalone boarder for the pickguard. The groove is fairly shallow due to the thinness of the plastic. The splines kept on lifting out, and it took a while to cut them properly. It wasn’t easy. Dave tacked them in with crazy glue but was worried that the splines weren’t well seated, and warned me that there could be problems later on when we sanded them flush. Nothing else could be done to improve chances, so I removed the rest of the tape and he applied a liberal amount of glue to the entire spline. Next I started the scraping process using a handheld razor blade – hard to hold. Tuesday evening I went to the hardware store and bought a 1” scraper. Will try it out in the morning.
More on building a guitar – Monday
On Monday, April 04th, 2011, with my patience totally exhausted, I headed back down to Malone, N.Y. to do some more work on the 2nd guitar. The back had been glued to the sides and it looked great.
The first task was to sand the point of the cutaway flat and even, which is harder to do than it sounds. The edge must be even and level with the neck block, without introducing any skewing or bevel. For some reason I had trouble getting the hang of it. Short even strokes do the job best. Dave corrected me several times and finally took over at the end to produce a nice even platform on which the new rosewood tip would rest.
Next a small piece of rosewood was shaped to a point and glued to the flattened tip of the Florentine point.
After lunch I sanded the new tip flush with the sides of the guitar body. It took a fair amount of sanding, even after Dave did preliminary shaping with a dremil drum sander. I also sanded the inside of the Florentine cutaway.
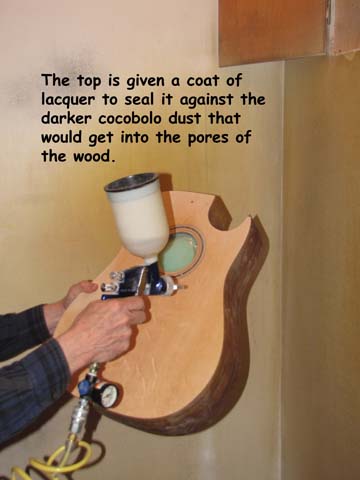
Next was handsanding the guitar top, first with 100 grit, then with 150 grit. Lee then sprayed it with water to raise the grain, and then wiped off the excess with a paper towel. A hair dryer was used to completely dry the top – very important to attain a completely dry surface, or there’s a risk of tearing out the fibers as opposed to sanding them smooth. Then sanded with 150 grit. Another spraying and drying. Then 220 grit & a rinse and a drying. Then 220 grit again. Another rinse, and a drying, then 320 grit. Another rinse a drying, and 320 grit again. Finally it was ready for a quick coat of lacquer to seal it from the darker cocobolo wood dust.
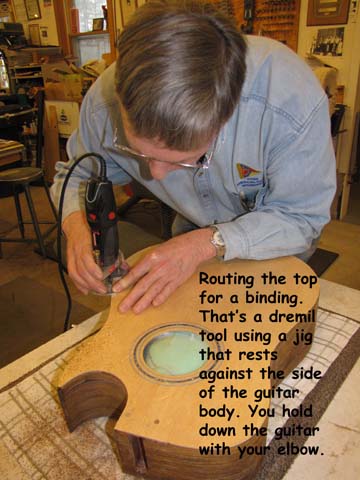
After the lacquer was dry I started routing the rabbit for the top binding. Dave set up the router for each of the four passes and did the routing of the tip of the Florentine curve. The tip is hard to do – you have to be very careful to keep the router base level with the top and the guide it by eye, because the jig guide no longer makes contact with the side of the guitar. If a mistake is made, and a gouge results, it’s very difficult to fix… I routed the rest of the guitar body.
By 5:00 pm the top had been routed, and I had figured out that this was going to take a long time, and, there was still lots to be done…..
During my visit to Malone, I stayed in a Bed and Breakfast place called the Park Street Inn – I highly recommend it – Great breakfasts and comfortable rooms and a bed that was heaven to sleep on.
Building a 2nd Guitar
I’d been keen to build another guitar for some time, or should I say keen to see another guitar being built by a set of world class experts, using parts that I’ve inlayed. Basically at Custom Pearl Inlay, they just won’t let me screw it up. And in some cases, they’ll even let me sand a piece or two, as long as I’m not too aggressive with the corse sandpaper. All in all, it’s a pretty good deal.
Therefore in March of 2011, I journeyed to Malone, New York, and started on a new guitar. This one will have a lot of inlay, most of which I did beforehand. Click on “My Work” then on “Martin Tree of Life” and on “Headstock and Bridge” to see closeups of that inlay.
It’s hard to describe how much this means to me. The anticipation, the constant thoughts about the “next step”, the instant smile when I think about it.
It’s all good.
So, I went to Malone for a week, and got the “build” to a certain point where the top was glued onto the sides, and the glue on the side braces was drying. Then I had to go home, because that’s all of Dave Nichols’ time that was available to me at that point. I’ve booked more time in April, and right now I simply want to get working on it again. It’s very hard to be patient until I can get back to it.
Below are some annotated photos of the guitar “build”. Just click on a picture to see it full size so that you can read the annotation…
There’s always lots to do
Some time ago I cut the pearl, routed the cavities, and glued up a fretboard for a special guitar that I someday wanted to build. I wanted it to be fairly highly decorated so, in addition to the fretboard, I also inlayed a bridge, and a headstock. If you’d like to see the fretboard Go to the “My Work” page and click on the “Martin Tree of Life” page for pictures of it. I also inlaid a headstock and a bridge – they are also shown under the “My Work” page.
I’m now in the process of designing a pickguard, and cutting the pearl pieces for inlying into it.
And, in a short while I’ll be heading down to Custom Pearl Inlay in Malone, New York, to begin work on the new guitar. I’ll be bringing along a camera and will post pictures as the building of the new guitar proceeds.
Here’s a quick picture of the inlaid bridge.
The Building of a Banjo
Banjo built by many hands
A friend of mine was asked for advice by his nephew regarding his purchase of a musical instrument. The friend, on a recommendation from his banjo teacher, purchased a Saga banjo kit, and asked me if I could inlay the headstock and fretboard with something. We talked about it for a while and came up with the idea of stylized wheat. He provided a rough picture of what he wanted and I made a few suggestions. In the end we decided on some Mother of Pearl maple leaves for the fifth and twelfth frets, with MoP dots for the 3rd, 7th, 10th , 15th and 17th frets. The headstock would have a MoP stylized wheat, with an abalone maple leaf between his nephew’s initials.
Unfortunately, the banjo kit came with a bare headstock that wouldn’t show off the mother of pearl very well, so I traced out the headstock on an ebony blank, and laminated that to the headstock. Just click on a picture to see it enlarged.
As well, the kit was missing some pearl dots, and there was no way to get the replacements in time for making this a Christmas event, so we discussed what to do. It was a choice between more MoP maple leaves and simple dots. In the end we choose the dots. Once the inlay was done, my friend completed the assembly of the banjo kit, applied an appropriate finish to the wood parts and passed it over to his nephew in time for Christmas festivities.
His nephew was very pleased with his banjo. It plays well, and is special to him for all the right reasons.
Below are some pictures of the finished banjo. Just click on a picture to see it enlarged.

